Download Windows 7 RAM test. Programs for testing RAM
If the computer “glitches”, “slows down”, often “freezes”, “gives a blue screen of death” and other unpleasant failures and strange things happen to it, then often the reason for such improper operation of the computer is faulty, “broken”, failed RAM , the module of which, unfortunately, cannot be repaired, but can only be replaced. To identify problems and malfunctions in the RAM, you need to perform a RAM test. How to test your computer's RAM? Download and run the free MemTest86 program to identify RAM faults. Perhaps it's all about the RAM? MemTest86 is a reputable program among its peers and will find errors in the operation of RAM where standard checking tools are helpless.
To check the RAM for errors, the MemTest86 program must be written to a CD/DVD disk, USB flash drive or floppy disk. The program tests memory at a low level, in a “clean environment”, without connecting additional drivers, without an operating system. MemTest86 looks for RAM faults by working directly with the RAM chip. Since the program uses its own boot loader, to create a bootable flash drive, floppy disk or laser disk with the MemTest utility, you need to prepare and connect the drive, run the corresponding file to create bootable media, restart the computer and start from the created device. Testing RAM includes a set of tests that check memory by writing the entire memory with repeating blocks of data in various ways, followed by reading and checking the written data in several passes, from low to high memory addresses and vice versa.
|
|


The text interface of the program is not at all confusing and does not in any way limit the possibilities for testing RAM. MemTest displays detailed information about the memory modules installed on the computer, displays the operating frequency and timings of the RAM, the amount of RAM, the slot into which the module is inserted and information about the processor. If you prefer Linux OS, MemTest86 will prepare for you a list of bad memory addresses, which can be used to patch the BadRAM kernel and thereby eliminate the use of bad memory areas. However, further use of faulty modules is categorically not recommended and, as practice shows, if the memory begins to “crumble,” then new “broken” memory addresses will inevitably appear, more and more often, until the memory chip completely fails. In addition, the use of faulty memory modules can lead to data loss that will be impossible to recover. This is due to the fact that information is written to a file from RAM, and “broken” memory, as the primary source of information, already contains distorted data before recording.
|
|

Why MemTest86?
The MemTest86 program has proven itself as a tool for diagnosing RAM since 1981, has gone through many updates and is considered one of the best programs and reliable tools for testing and identifying RAM errors. Using MemTest86 you can identify memory errors even where standard tools such as BIOS, operating system and system utilities are absolutely powerless and do not detect any failures. The MemTest86 diagnostic algorithm allows you to calculate bad address sections on a memory module already on the first test pass. With MemTest86 it is possible to diagnose DDR1, DDR2, DDR3 modules with any operating frequencies. The MemTest86 utility allows you to thoroughly test and identify errors and bad blocks of RAM. MemTest86 works and is compatible with almost any type of RAM modules on the market, remaining a free application for many grateful users.
Official site: http://www.memtest86.com
OS:
Windows All
Supported languages: English
Version: 4.3.5
License:freeware (free)
File size 2.82 MB
Hello dear readers, today I’ll tell you how to do it myself, and it will also be Memtest86+ instructions using the most popular program that does a good job of testing RAM.
Testing RAM yourself?
Implement There are two ways to do it yourself or with the help of a program. To begin with, I would advise testing the RAM yourself, how? Now I'll tell you. In most cases, the problem is in the RAM. And to identify problems in your computer, you need to start with RAM testing.
— The easiest way, this is to pull out the strip or strips, if you have more than one, and wipe the contacts that were on the motherboard. You can wipe it with alcohol or an eraser. It is better to wipe with an eraser, because... the alcohol may not dry and short the contacts. Or wait longer for the alcohol to evaporate. You need to wipe what is highlighted in the picture below. We put it in and try it. The fact is that the contacts may oxidize or dust may get on them and current may not pass through the contacts, or not as it should.

— Second way If the first one does not help, this testing by elimination method. This method is relevant if you have more than one stick of RAM. If not, we move on to testing RAM using the program.
We take and remove one strip from the motherboard and look at the performance of the computer. If the errors do not disappear, put the bar back and take out the other one, and so on one by one test RAM. If the computer began to work stably on any strip, it means that errors arose due to the strip that you pulled out. If you inserted new RAM and there is no image on the computer, it means the motherboard or processor does not support it. The only way is to flash the motherboard with the latest firmware from the official website of the manufacturer.
How to fix RAM yourself?
An extreme measure, but even this measure helped some, so... I once saw a way RAM repairs eraser. Yes, yes, it’s for them, for this we take an elastic band and preferably one that is stiffer and wipe the SMD elements.
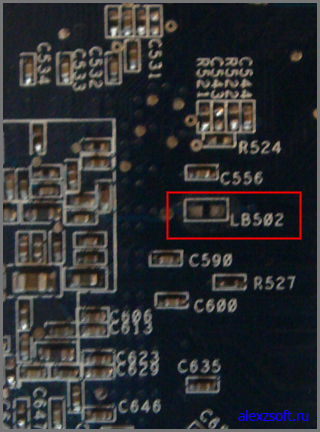
SMD elements (SurfaceMontageDetails), translated as surface mounting of parts. Those elements that are on top of the board. Let's say small chips.

How to test RAM?
The most reliable option for testing RAM is Memtest86 program. How to download or I already wrote, so this should not be difficult for you. , write to a disk or flash drive. You can also download a collection of utilities, again I recommend Sonya PE. In general, stop pulling the cat by the tail; upon startup, this window will appear:

If you downloaded the Sonya PE assembly, then you need to choose here:

After launching it, the program will check your RAM is infinite until you stop it with the ESC key. You can check all the strips at once, or one at a time. By checking all the strips, the program will not tell you which error, so if there are errors, it’s better to check one strip at a time. It is better to do several cycles to check. And for maximum effect, it is better to check it at night program Memtest86.
The Pass field indicates the number of cycles completed. If you have errors in memory (Error column), you will see something like this:

It is impossible to correct RAM if there are errors in the program. This is not like erasing bad sectors on a hard drive.
Well, in general, I always threw them away, because... They are now very cheap, even high-speed ones.
The program contains 9 tests:
Test 0 —– testing to identify problems in the memory address.
Test 1 — [ Addresstest, ownaddress] – deep test to identify errors in memory addressing registration
Test 2 — [ Movinginversions, ones& zeros] – checking for subtle and hardware errors.
Test 3 — [ Movinginversions, 8 bitpat] – like the previous test, only it uses an algorithm in an 8-bit approach from 0 to 1. 20 different methods are tested.
Test 4 — — Identifying errors related to data sensitive. There are 60 different methods in this test.
Test 5 -– Finding problems in RAM circuits.
Test 6 -– The longest test to identify data sensitive errors.
Test 7 — [ Randomnumbersequence] – Checking for errors in memory recording.
Test 8 — [ Modulo 20, ones& zeros] – Detection of hidden errors in RAM using buffering and cache.
Test 9 -– The test can be started manually. He writes down addresses in memory, after which he goes to sleep for 1.5 hours. After waking up from sleep, it checks the bits in the addresses for similarity. Key C for manual start. The test requires about 3 hours of time. Now you have seen how it is done RAM testing, how to restore its functionality yourself and check it using Memtest86 programs with the instructions provided.
Good day.
Quite often when the computer/laptop behaves unstable (for example, errors began to appear, freezes, a blue screen appears, there are image distortions, etc.), you need to check the random access memory (RAM).
During this testing, you can find out if everything is ok with the memory, if there are any errors, or if the die needs to be replaced (by the way, it may be a good idea to test the RAM when purchasing a new stick).
In general, memory diagnostics can be done in different ways:
- use Windows diagnostic tools (if you have Windows 7, 8.1, 10);
- or use third party software (in my opinion, one of the best utilities for such a test is Memtest 86+).
In this article I will consider both of these options (in general, of course, the second option is more preferable!).
In general, in my personal opinion, the built-in software in Windows is, as a rule, inferior to third-party software. Therefore, nevertheless, if you have a free flash drive (CD/DVD disk), I recommend using the test in the Memtest 86+ program (see in the second part of the article).
And yet, how to run a check of RAM strips in Windows (relevant for Windows 7, 8, 10):
- press a combination of buttons Win+R;
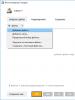
- in the window that appears "Run" enter the command mdsched and press Enter (as in the screenshot below).

- reboot and check now (i.e. start checking immediately);
- perform a check the next time you turn on the PC (this is what I recommend choosing so that you can save all documents without haste, close programs and calmly send the PC to reboot).

If everything is OK with the diagnostics, you will see a message that the memory test was scheduled successfully.

After restarting your computer/laptop, you will see a window like the photo below. 2 passes will be performed, the status of the operation is shown at the bottom of the window. If everything is fine with your memory, then the state will be in the status "No problems found yet".

If problems are found
Testing RAM in Memtest 86+
Memtest 86+
![]()
Memtest 86+ is one of the best utilities designed for testing RAM. The utility can be launched using its own bootloader, so, in principle, it does not need an operating system.
The program supports modern multi-core processors and most motherboard chipsets. Memtest 86+ is available for download on the official website (link above), in the form of several versions. A few words about them below...
About the program version Memtest 86+ (V5.01):
- Download - Pre-Compiled Bootable ISO (.gz)- the program is distributed in an ISO image. This image can be used even on a regular CD/DVD disc (however, additional utilities may be needed - for example, Ultra ISO) . In general, a universal option;
- Download - Pre-Compiled Bootable ISO (.zip)- the same thing, only the archive format is different;
- Download - Pre-Compiled Bootable Binary (.gz)- a file in bin format (this is also a disk image, similar to ISO);
- Download - Pre-Compiled Bootable Binary (.zip)- the same;
- Download - Auto-installer for USB Key (Win 9x/2k/xp/7) *NEW!* - the most popular option (in my opinion). Allows you to automatically create a bootable USB flash drive with Memtest 86+ in a few steps. The program works in all versions of Windows: XP, 7, 8, 10;
- Download - Pre-Compiled package for Floppy (DOS - Win)- creating a boot floppy disk (in my opinion, it is practically not relevant today).
I chose the 5th option (Download - Auto-installer for USB Key (Win 9x/2k/xp/7) *NEW!*), and I will use it to show you how to create a flash drive.
Creating a bootable USB flash drive with Memtest86+
Download the archive, unzip it and run the program file (version selection is given above). Next, you need to insert the flash drive into the USB port and:
- in the first window the program will ask you to specify the drive letter of the flash drive (important! All data on it will be deleted before recording Memtest 86+) ;
- then you need to check the box next to "We will format G:\as Fat32" and press the button "Create";
- wait for the message "Installation Done, Your Drive should be ready to boot" (means the media is recorded);
- by the way, if you go to "This computer"- you will see that the name of your flash drive has become "MULTIBOOT".

Creating a bootable USB flash drive in Memtest 86+
Booting from a flash drive and running the test in Memtest 86+
To boot from the flash drive created earlier, you need to configure the BIOS accordingly (or use the button to call the Boot Menu). This topic is quite extensive, so below I will provide links to my articles.
How to configure the BIOS to boot from a flash drive or CD/DVD -
Hotkeys for calling Boot Menu -
I used the Boot Menu, indicated what to boot from (USB flash drives) and pressed Enter (screenshot below).

Next, if your flash drive is written correctly, the Memtest 86+ utility will automatically launch and begin testing RAM. You don't need to click anything. The red arrow in the photo below shows the progress of testing (what percentage is verified).

Testing in Memtest 86+ // starts automatically
Note! Just in case, I’ll give you the control keys (although in most cases they are not needed).
Esc – close the program and restart the PC;
C – setting parameters in manual mode (for experienced users);
F1 - Enhanced Fail Safe Mode.
F2 - Experimental SMT support up to 32 cores (experimental SMT support up to 32 cores).
At startup, the computer components are analyzed, then the RAM testing begins.
If the test does not start in auto mode, run it by pressing the F1 or F2 buttons.
In general, I recommend leaving the PC tested like this for several hours so that the utility runs the memory several times. If everything is fine with the memory, you should see a message at the bottom of the window "Pass complete, no errors, press Esc to exit" (as in the photo below).
Note!
Memtest 86+ writes information to each memory block, and then reads it and checks for errors. The program tests RAM cyclically, i.e. by default she has 11 tests (including zero), which she runs in circles an unlimited number of times (until you stop it by pressing Esc).
Everything is fine with memory // passed the test
If errors are found during testing, you will see red lines (this is not good in any case (at least)).

What to do if errors are found
Quite a popular question, along with memory testing questions...
First you need to open the system unit and clean it of dust. Remove the memory sticks from the slots and blow out the slots themselves (it’s convenient to do this using a vacuum cleaner with reverse mode, or a can of compressed air - these are sold in computer stores).
Also pay attention to contacts. The fact is that after some time they can oxidize, and when inserted into the slot they do not (not always) fully make contact. As a result, as soon as the contact is “lost,” your computer freezes. I recommend cleaning them in any case; a regular eraser/eraser (school eraser) is suitable for this. The remaining pellets can either be blown off or brushed off with a soft brush.

Cleaning memory contacts with an eraser and a brush
Note. The procedure must be carried out extremely carefully, on a clean, dry, flat surface. The best rubber band is the one with two sides: one blue and the other pink. It is recommended to rub blue. In some cases, the yellow contacts change color to a lighter color.
After cleaning the memory, reinsert it into the slot and turn on the PC (by the way, try inserting the memory into other slots, or swap the slots if all your slots are occupied).
Next, test again. In some cases, such a simple procedure allows you to get rid of memory-related errors, the computer stops freezing, rebooting and producing a blue screen (thereby saving you money).
If errors are found again, you can try to send the memory for repair (but I personally do not recommend it). If there is no warranty service, it is better to replace it with a new one (the fact is that the cost of repairing RAM - in many cases, costs almost the same as a new stick).
That's all I have for now. Additions are welcome...
It will probably not be a discovery of the century for any user that most error messages that appear when working with Windows 7 arise due to all sorts of problems with the computer’s RAM. At the same time, detecting them is not as difficult as it seems at first glance, even without resorting to the help of third-party programs. The point, in fact, is that Windows 7 itself already has a built-in utility for checking RAM, which in terms of efficiency is not much inferior to similar analogue programs. Want to check it out? Then let's get to work!
Option #1: Microsoft System Method
It is worth noting that testing RAM using Windows 7 itself can be done differently depending on whether the computer is in working condition or not. In particular, to routinely check the performance of RAM on a PC, you can use this method:

In addition, it is possible to check the operation of the RAM when starting Windows 7. In this case, when starting the computer, you will first need to press F8 to get to the menu of additional boot options, and then alternately select Esc on the keyboard (to access the Windows boot manager), Tab ( to select a memory test tool) and finally Enter (to start diagnostics): 
At the same time, you can also perform a RAM test using a disk with the Windows 7 distribution kit. In this case, after launching it on the computer in Windows installation mode, we only need to open the system recovery options and select the memory diagnostic program from among them. The whole process looks something like this: 
In any case, regardless of the chosen method, after starting the RAM system diagnostics, a blue window will appear in which the entire progress of the test will be displayed:

However, you need to take into account that by default in Windows 7 the usual set of several standard RAM tests is selected. It provides, of course, a fairly time-efficient, but average-in-effectiveness check: 
In this case, for a more thorough analysis of RAM after running the utility, it is preferable to reconfigure the test scheme, choosing a wide set instead of the usual one. How to do it? Simply press F1 and then Tab to select the appropriate option and F10 to save the setting. Similarly, you need to disable cache checking and increase the number of passes to at least 20 in order to increase the efficiency of passing the test.
One way or another, after completing the RAM analysis, the testing tool built into Windows will notify you of all errors found in a report or in a system message after restarting the PC (depending on the selected diagnostic method).
Option No. 2: RAM test programs
At the same time, the RAM on a computer with Windows 7 can be checked for errors using special RAM tester programs. They are presented quite widely today, but among them all free software tools such as SuperRam, MemTest86 and SiSoftware Sandra deserve special attention.
The easiest to use among them, undoubtedly, is the Russian-language SuperRam utility. At the same time, in terms of the effectiveness of RAM tests, it is not much different from the well-known software “monster” MemTest86. This utility, in particular, allows you not only to test RAM on your computer in different modes, but also automatically increases the productivity of its use. In addition, the program is compatible with absolutely all RAM modules and versions of Windows, which turns it into a truly indispensable tester for PCs. 
Meanwhile, at the first signs of the impending death of RAM, appearing along with the blue screen of death, the MemTest86 program can bring the computer back to life. Its peculiarity is that, unlike many other similar utilities, it is launched in a “pure” form using its own bootloader, which provides it with a more thorough test of the operating memory for bugs. 
True, MemTest86 also has two small drawbacks. Firstly, in order to check RAM with its help, you will first have to pore over writing a resuscitation flash drive with an iso image of the utility; and, secondly, the analysis process using this testing software tool usually takes quite a lot of time - from 1 hour or more, as practice shows. 
As for SiSoftware Sandra, this program can hardly be called a full-fledged RAM tester, given that it has both a general Windows stability test and separate modules for analyzing the state of the motherboard, CPU, video card and other equipment connected to the PC. Meanwhile, its efficiency indicators are quite good, which, however, sets it apart from a dozen other analogue programs.
How to find out what RAM is in a computer or laptop?
The need to find out what kind of RAM they use arises among users who work or play on an unfamiliar PC or simply were not interested in this parameter before, but for some reason they needed it.
In principle, Windows tools are sufficient to determine only the amount of RAM.
But to obtain more detailed information (memory type and frequency), you will have to use additional programs, mostly free or shareware.
Why do you need to know the type of RAM?
You may need to find out the size of memory installed on a computer or laptop running Windows, for example, before launching a program that requires a certain amount of RAM to operate.
If it is not enough, you can solve the problem by installing a new or additional memory stick; You can also, if necessary, replace memory that has failed.
In each of these cases, the RAM must be supported by the motherboard and processor.
In addition, if the memory does not change completely, but is supplemented, it must comply with the already established level.
- When the computer boots, press the function key to go to the BIOS (usually F2, F5, Del or Esc);
- find the Memory Information menu (can be located on the Chipset tab).

The new type of BIOS, UEFI, provides complete information about memory (type, size, frequency).
Therefore, if there is such an interface, you will not need to use special programs.

The easiest way to view memory size data is:
- in system properties (“Start” ⇒ “Computer” ⇒ “Properties”);

- when running the msinfo32 utility (Run menu ⇒ entering the msinfo32 command).

The last two options allow you to find out the amount of working, not installed, memory.
So, if the computer has 32-bit Windows installed, and the RAM exceeds 3 GB, this amount will be determined and strictly used - 3 GB.
A larger volume, firstly, is not shown by the system, and secondly, it will not be used during operation.
To improve the efficiency of your computer, it is worth reinstalling the OS - replacing it with a 64-bit (64-bit) one, which will “see” your amount of memory.
Determining RAM using third-party programs
If you can’t get any details about memory using standard tools, you will have to download and run one of the applications that collects information about the system.
Specialized programs such as CPU-Z, AIDA64 and HWiNFO32-64 will determine the memory frequency, its size and type.
In addition, as a result of their use, you can find out the number of slots for memory sticks on your motherboard and what RAM is installed in each of them.
CPU-Z
A convenient and useful utility called CPU-Z can be easily found on the Internet.
It is best to download it from the manufacturer’s official website, where not only working ones are located, but also the latest versions.

To find out memory data after launching the application, follow these steps:
- go to the Memory tab;
- Read information about the type and frequency of RAM.

On the tab General you'll find basic memory information, including type and total capacity.
And on the menu Timings– its timing and operating frequency parameters.
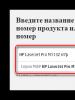
To find out exactly how many sticks are on the computer and in which slots they are located, you should go to the following SPD tab:
- select the SPD tab;
- open the list of memory slots in the window that appears;
- Having selected a specific connector, look at the data about the module installed in it.

Using this information, you can easily select not only the appropriate type of RAM, but also ensure dual-channel mode, in which the computer runs faster.
Advice: the system will remain operational even if the memory sticks are different in size and their number is odd.
However, it is more convenient to arrange modules in pairs and of the same size - for example, 2 x 8 GB or 4 x 4 GB.
AIDA64
The AIDA64 application is an improved version of the older Everest program, but is designed for 64-bit systems.
The set of utilities is paid, but the user is given the opportunity to use its resources for free for 30 days.
To use the program, you need to download it (preferably from the official website of the Russian representative of the developer) and check the computer resources:
- launch the application;
- wait for the system application to scan;
- find the “Motherboard” item on the left side of the menu that opens;
- select the SPD sub-item.

The window that opens provides as much memory information as possible, including:
- module volume;
- memory type and speed;
- model, manufacturer and release date;
- bus width.
Here you can also find out other information that you will need if the task of determining memory parameters was to install a new module.
It is possible that the motherboard supports more powerful RAM (DDR4, not just DDR3, increased frequency), as a result of which, after replacement, you can increase the speed of the computer.
HWiNFO64-32
Another universal program for obtaining system data, including information about RAM, is HWiNFO32-64.
It has approximately the same capabilities as AIDA64, but differs from it in the ability to download the full version for free and the presence of a portable version, which you don’t even have to install on your computer.

conclusions
After determining the volume, type, frequency and other parameters of memory, you can select the modules that are suitable for your computer.
As a result, the performance of the PC will either be restored (if the task included replacing a damaged stick) or improved (if RAM is added).
And, given the simplicity of all these methods and the relatively low cost of memory compared to other computer parts, you will spend a minimum of time and money on this.
Helpful video: